Importing
Sports Cars GT cars
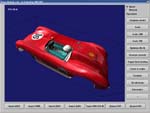
| A Ferrari
312 body is tested and enhanced in Racer's Modeler. |

|
This
tutorial will show you how to get SCGT cars into Racer. Before continuing, make
sure you get the following:
- A
Windows PC, which is needed to get the files from the .MAS files; no Linux
or SGI support for this is known to me.
- Tony
Hirst's VRL2VRML
- Tagforce's
MASpuce (v1.0 or higher, perhaps MAStudio might be the choice of today)
- An
SCGT car (download the SCGT version of the
Ferrari from the picture above from this site, or go here
for quite a lot of cars)
- Racer's
Modeler and perhaps CarLab (see the download page)
- At
least about 20Mb of free disk space while converting
- Optionally,
use 3D Exploration (see http://www.xdsoft.com/explorer/)
for a great generic model viewer.
The
steps in short are like this (I'll talk you through the steps below):
- Extract
the MAS files to get to the VRL files and the BMP texture images
- Convert
the VRL files to VRML
- Import
the VRML files with Modeler to DOF files, modifying some
- Import
the VEH file to get some physics data right
- Test
the car
I'll
assume you downloaded the example Ferrari P4 by Pat Painter. First, unzip the
zip file to a temporary directory, say C:\T\FERP4. You get some audio, a thumbnail,
a .MAS file which contains the models and texture images, and a .VEH vehicle
file which describes the physics.
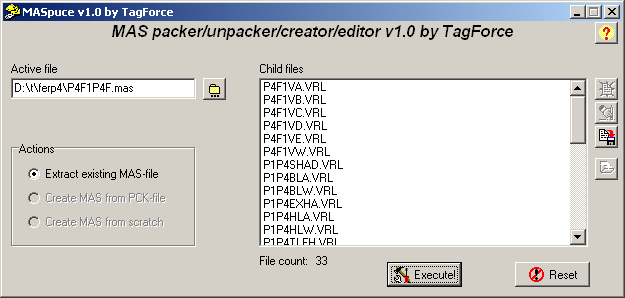
Run
MASpuce, and open the .MAS file (P4F1P4F.mas in the case of the example
file).

Now,
click Execute to extract the files to the directory (by default, all files are
extracted; if you have selected any Child Files, select all 'Child files' (click
the first, then scroll down and Shift-click on the last file), then click on
"Execute" to unpack the VRL and BMP files to the same temporary directory).
If it asks for a .PCK file, just enter 'ferp4' and press Enter. The .PCK file
is not used.
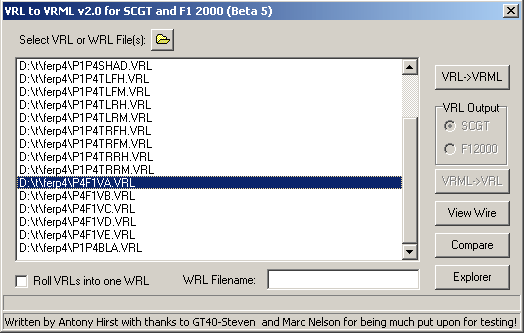
Next,
run VRL2VRML and open all the .VRL files in the directory. Select the P4F1VA.VRL
file. The filenames of the SCGT VRL files are a bit cryptic, but you'll recognize
this as the body. The A upto E versions are models that go from high-detail
to low-detail. I'll use the highest detailed version. SCGT is quite old by now
and it doesn't really use that many polygons. Use 'View Wire' if you're not
really sure if you have the right model.

Next are the steps (I must elaborate on
these later):
- Create a new car directory, for example, data/cars/mycar
- Copy a car.ini from an existing car as a base for the
car's physics (data/cars/ferp4/car.ini for example).
- Also copy other important files: all *.crv files (torque.crv
for example), and the views.ini file and any other .ini files you encounter
in this directory. Also copy the view .tga files (rpm*.tga, kmh*.tga).
- For sounds, copy all .wav files too. For example; engine.wav,
skid.wav etc.
A fallback mechanism to have some sound if none is in the car directory is
being design (22-3-01).
- Don't modify the car.ini file too much just yet. What
you WILL want to edit is the starting comments, and the car.name value. This
last value will be shown in Racer's Config screen when you select a car.
- Use Modeler to convert the body WRL file to DOF format (this
loads much faster, and can contain optimized meshes).
In more words: run Modeler, click 'Import VRML' and select the body file (P4F1VA.wrl
in the example). After you've loaded it, it looks small; press 'Scale x100'
to see it. It's probably without textures, but not to worry, that's for later.
If you really want to see them, make a subdirectory called 'images/' in the
temporary directory where you're loading the .wrl file from, and copy (don't
MOVE) the texture images (*.BMP) to that directory. Re-import the model, and
any textures that are supplied should be loaded.
To get better performance, click 'Optimize', and select 'Generate normals'
after that. This will normally make a bad-looking model (rendering errors)
turn into something much better. Also try to give it some shininess (values
from 10 to 50 do a nice job).
You may wish to use 'Enlighten model' if there's still a lot of black materials
on the car.
Scale the model back (Scale /100) and click 'Export DOF'. Name the file 'body.dof'
(this name is preferred).
- Copy the .DOF and .BMP files to the car directory.
- Use CarLab to select the .dof files, or edit car.ini
directly (for starters, editing the file directly is actually faster and better).
Make sure the body.dof model is loaded in car.ini (see body.model.file).
- Test your car; most easily done in Carlab, and when
it works a bit, use Racer itself. Use Config to select your car, and if you
can, hook up a terminal (9600bps, 8n1) to COM1 to see errors to avoid checking
QLOG.txt for errors. Most crashes will first generate some errors, so you'll
know where to look.
- To export wheels, you need to convert the *TLFH.VRL
files into WRL and to DOF using Modeler. Note you must center the wheels in
Modeler before exporting to DOF. SCGT uses wheels directly placed at the car
location, but I use a more centric approach, so rotating the wheel is easier.
The wheels are placed at their absolute position in SCGT/F12K.
Racer uses wheels that are centered to the origin. Here are the steps:
- Use Modeler to import the wheel WRL models (there 4 of them,
above your can see P1P4TLFH.VRL for example, the *T*ire, *L*eft*F*ront in
*H*igh detail).
- To get a close look, click 'Scale x100'.
- Use 'Center to Origin' to get the wheel in the right place
for Racer.
- Click 'Optimize', and after that 'Generate normals'.
- Optionally you can use 'Enlighten model'. Gives a nice shine
to the wheel often.
- Scale back ('Scale /100').
- Export the wheels as .DOF (you might use the same names,
only use a .DOF extension) in the data/cars/<yourcar> directory.
Now you must get the wheels at their right location under the
car. Modify car.ini in the following way:
- Find 'susp0' (upto susp3) and find the relative location,
susp0.x/y/z. This is the basic attachment point of the suspension, but the
wheels are located relative to the suspensions. So insert the X/Y/Z offset
from the center of the car here. For example, the default Ferrari has x=.7,
y=0.4, z=1.3 for its front left suspension (susp0).
- Do this for all suspensions; you probably only need some
mirroring, i.e. x=-.7 for the next suspension (y/z remain the same, but make
sure they're in the car.ini file).
- The wheels themselves have an extra offset with regards to
the suspensions; wheel0.x/y/z belongs to susp0 for example.
Modify these if you don't want the default values of 0/0/0 (it may be best
just moving the suspensions and leave the wheel offset at 0; no suspensions
are being drawn anyway).
- Add the model as wheel0.model.file=<wheelmodel>.DOF
(do this for all wheels).
- Black textures; during your importing in Modeler you'll
probably find that you can't see the textures. This doesn't matter too much
really, as long as the textures are in the car directory, Racer will find
them when it runs. If you insist, you can create a subdirectory called 'images/'
in the directory where you call Modeler from, and copy the images there as
well. This will display them in Modeler itself.
- Dark models; perhaps you'll encounter these. I believe
I had to enlighten the wheel models for the Ferrari. Just loaded the WRL model,
scale by 100 (to get a look), click 'Enlighten Model', then scale back (/100)
and export to DOF. You can do the same later if you already have the DOF model;
just import the DOF, enlighten, and export again.
You can use the .ar format
to pack your files in one, also protecting the files from unwanted modifications.
This will also enable quicker loading.
(last
updated
November 13, 2012
)


