
| Home | Bend the objects. |
|
|
|
Introduction
Racer v0.8.6 started supporting skeleton animation. Here's a document on the various parts of animation. It is based on v0.8.9 of Racer, v4.0 of Modeler (included in Racer v0.8.9) and uses 3D Studio Max in the process.
The idea is to create bones in Max, then export those using a Max script, and process those in Modeler.
This tutorial will take you through the process of adding an animated person to a track in Racer. It assumes you have created a 3D model including bones in Max already. The data for this tutorial can be downloaded here (it contains a .max file and a .tga texturemap).
A reference to the animation functionality in TrackEd also exists and can be found here.
If you do not have 3D Studio Max
The tutorial here is targeted at Max, but you can skip the Max exporting stage described below. In the export, 2 files are generated; an .ASE 3D model file and a .DSkeleton file which contains bone & animation information. You can download both here and continue to the Modeler conversion step.
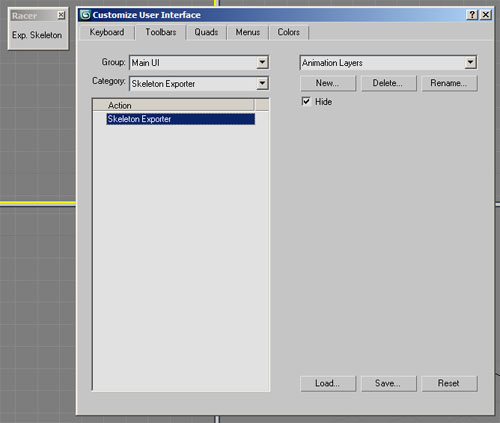
How to install the skeleton exporter for 3D Studio Max (assuming Max 2009)
Racer (v0.8.7+) includes this exporter in its installation (c:\sims\racer\max\skeleton_exporter.mcr). You need to copy this file to Max.
Use the Windows explorer to navigate to:
Copy the macroscript (skeletion_exporter.mcr) to this folder. Now we hook this macro to a toolbar inside Max:
Exporting the skeleton using the skeleton exporter
Create your skinned mesh with 3d studio max, with animation if desired (you can leave out the animation if you want to create a ragdoll for example that doesn't know any predefined animations; it will just animate through the physics engine when hit).
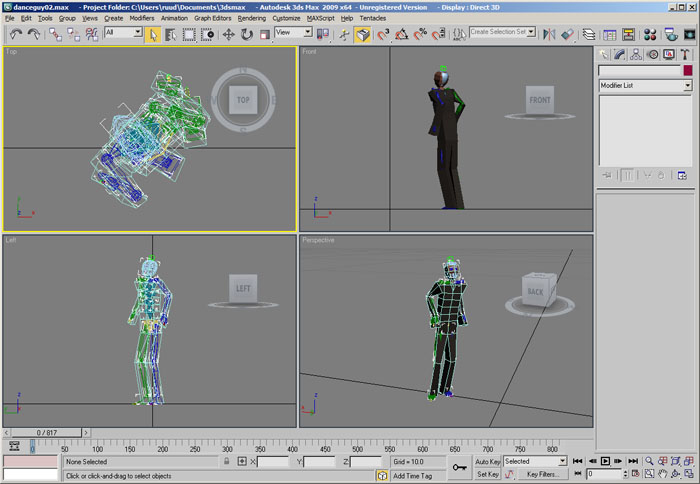
The mesh is like any other mesh that you model for use in Racer only now it has skinning. For this tutorial, you can open the included .max file (danceguy02.max) which contains a premade model plus skinning:
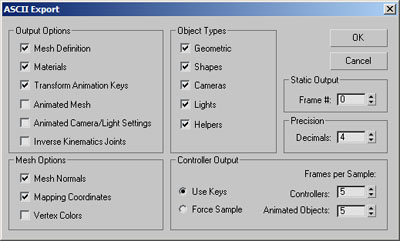
Select the model, select the menu 'File'->'Export Selected' and export the file in the 'ASE' format like you would when exporting any other Racer model (name it 'danceguy02.ase' for this tutorial). For the settings, see below (no need to turn on 'Animated Mesh' in the export dialog):
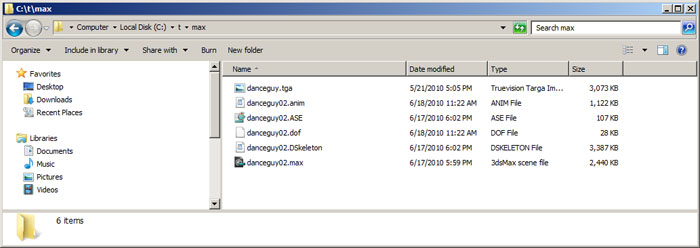
Now click the 'Exp. Skeleton' macro button and give the skeleton file the same base name as the ASE file. For this tutorial, you thus get the file 'danceguy02.DSkeleton'. This may take a bit of time, be patient. The .DSkeleton file is plain ASCII, you can optionally check it out to see how it's formatted, although that's not relevant for the next steps.
The skinned mesh should now be ready for importing into Modeler.
Notes on Max bone support:
- 'Physique' is not supported, only the 'Skin' modifier is.
- You can also use the bipeds from character studio, combined with motion capturing!
How to convert the ASE to DOF and optionally cut animations in Modeler
Now we have the animations all in one file.
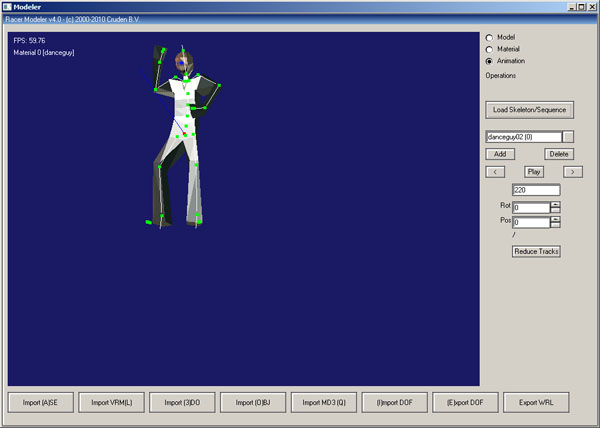
Since all animations from Max are now stored as one big concatenated animation, you want to cut the animation into smaller pieces, click the 'Add' button and input range and name.
Now export to DOF (click on the 'Export DOF' button) when ready, and name it 'danceguy02.dof'. The exported DOF gets an accompanied “danceguy02.anim” file (which is a binary file). You now should have a directory that looks a bit like this:
Integrating into the track
For this tutorial, we will make a new track based on Carlswood (the default track) and add our dancing guy to it, to avoid disturbing the original track. Clone the Carlswood track by navigating to c:\sims\racer\data\tracks, and copying the carlswood_nt directory. Rename the copied directory to 'carlswood_dance'.
Copy the 2 exported files from Modeler to the new carlswood_dance directory (danceguy02.dof and danceguy02.anim) so they become part of the track. Also copy the texture (danceguy.tga) to the track.
Now it's time to import this model into the track. This is done with Tracked, so run that (it's in the tracked/ directory; older versions have tracked.exe in the same directory as Racer) and click 'Select track' to open Carlswood_dance. Importing animated objects is done using the 'Animated objects' tab, which is accessible by pressing F7 or clicking the appropriate radio button on the upper righthand side of the screen.
Movables/animatables in Tracked
Let’s briefly go over the tabs:
The movables are stored in geometry.ini alongside the static geometry, and saved when you save whole the track (with the 'Save track' button, or by pressing Shift-S).
Adding the dancing guy
There is already one default animation group, called 'Group 1'. We will put the dancing guy in this group. Click the 'Creation' tab and 'Load DOF'. Navigate to the carlswood_dance directory and select danceguy02.dof. Note that you can only load a dof when it’s in your track folder!
Optionally, by clicking the “View anim’s” button, you can see the names of any possible animations stored in the accompanied .’anim’ file, see below. This file only had 1 animation; if you wanted more you had to cut those in Modeler before.

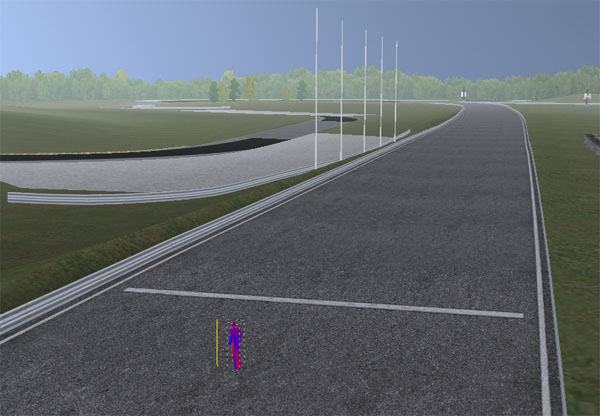
Now navigate near the starting grid, hold Shift and left-click the mouse on the location where you want to place the animatable. Then click 'Create' in the animation creation panel. The person should appear, although unshaded (red/purple texture). The animation here doesn't start at the origin, so the painted location of the model is a bit off compared to where you clicked.
You can edit the position and rotation with the sliders if needed.
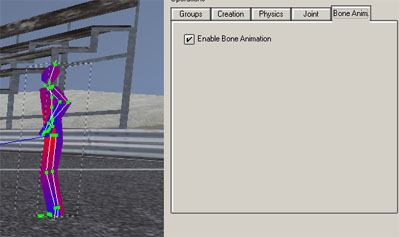
Now you want to enable animation support for this object in Racer, so click the 'Bone Anim' tab and enable it (alternative is to use physics bone animation). You should then see the bones appear:
Ofcourse, now Save the track and exit TrackEd.
Animation in Racer
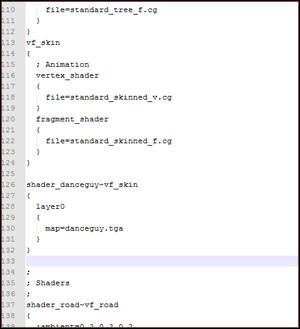
We need to define a shader for the model to avoid its red/purple look, and to also enable animation, which is done mostly on the GPU. Open data/tracks/carlswood_dance/track.shd. There are a couple of vf_* templates for other shaders, and also the shader_* definitions themselves. We need to add a 'skin' template (in case you have multiple animating objects) plus a shader for the dancing guy's material. See below:
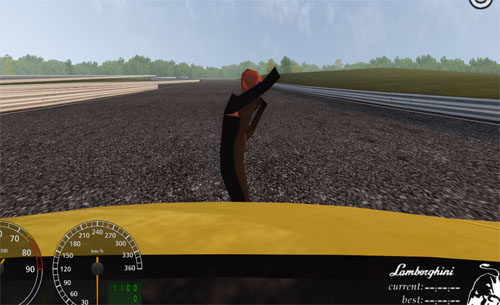
Now run Racer, and drive up to the guy. Then enter the console command 'anicmd 0 play' and see him move! For v0.8.9.2 onwards, this is 'anicmd 0 playloop 0' to loop the first sequence.
Triggerlines
Triggerlines are a way to trigger console commands when a car passes that trigger. You can create a trigger in the same way you create a timeline.
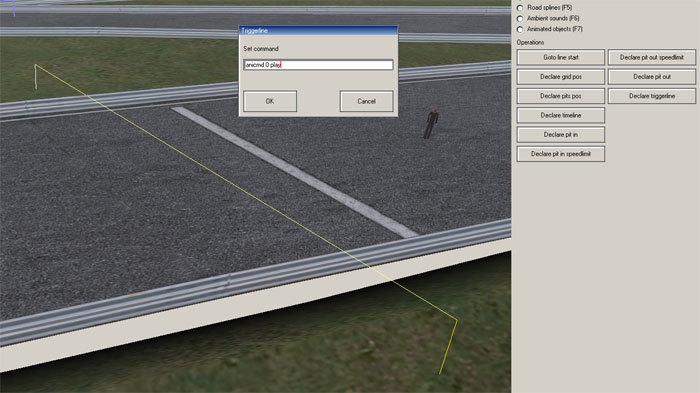
This will trigger the animation playback when you cross the trigger. Run Racer and drive over the (invisible) trigger. See below for a video demonstrating the end result.
Object mode in TrackEd
This alternative way of moving around in TrackEd’s 3D space is very useful when editing movables.
Press ‘O’ or click on the checkbox in the bottomleft corner. Now you can navigate around a virtual point in 3D space. Press the ‘E’ button to do a ‘zoom extents’ on a object. You can zoom use the scrollwheel to zoom. Move around by using the default combinations of buttons used in default navigation mode. Hold the Control key for smaller movements.
(last updated April 4, 2014 )