
| Home | Every physical aspect of the car should be in the car.ini file. |
|
|
|
Introduction
This document describes the various physical aspects of cars that you can tweak in Racer; it is the physics editor's Bible. As the featurelist grows, this list may not always be entirely complete; check out the file data/cars/default/car.ini, which will have 99.9% of all the possible variables set (these are used as default values in case specific car.ini files for other cars miss them). I'll try and add some generic information on how Racer simulates vehicles here as well, hopefully combining the completeness of a reference guide with accompanying information on how to use it (and what is and isn't simulated).
There is a special page for the Pacejka tire formula (which is used as part of the tire model). If you have a hard time getting a drivable car, the car physics troubleshooting page might help out. Also make sure you read the tutorial when you start a car (for info on car cameras etc).
Note this document isn't meant for setting up the car; that's a separate issue. This document describes the features behind the setting up, which are mostly static for the casual driver (who just changes suspension rates, things like that).
If you find settings (in car.ini files) that are missing from this document, please mail me so I can add the omitted parameter to this page.
Thanks go to Claes Wikdahl for creating the Mitsubishi Evo6 which I used in clarifying some concepts.
Changes
Throughout Racer's life, many new variables have entered the stage. See pitstop.totalnfs.net/racerwiki/index.php/Car_ini_changes for a list of changes sorted by Racer version.
Linearity is used in a number of places (controls, steering,
throttle, engine mapping, braking). If we take
steering as an example, 0 is fully non-linear, smoothing steering a lot when
not fully applied (around the center, steering is slow; it gets faster as you
come to the limits of the wheel rotation). 1 is fully linear. Values above 1,
upto 2 actually increase response, exaggerating the actual input (giving an
exponential response). Most controls will benefit from a mild non-linearity
though (0..1).
The shape used to get non-linearity is an x^3 polynomial. To be more precise, here is the pseudocode, where 'l' is linearity.
function Linearize(v,L)
if L>1 then {
L=2-L; if(v>=0){ invV=1-v; return v*L+(1-L)*(1-invV^3); } else { invV=1+v; return v*L+(1-L)*(-1+iv^3); }
else return v*L+(1-L)*v^3
General notes
Also, for aerodynamics for example, you can copy the default values and paste them into your car's car.ini file as a template for modifications. Added variables should generally not change you car's behavior (or not much) to keep forward compatibility.
| Miscellaneous car aspects | Chassis (body) properties |
| Steering | Engine |
| Driveline (gearbox, clutch, handbrakes,...) | Differential(s) |
| Aerodynamics | Suspension |
| Tires/wheels | Cameras |
| Driving aids | Lights |
| Everything about lights is on its own page. |
![]()
You can specify some information about the car itself. Nothing much is done with this, other than it may be used in the future in the 'garage' (where you select a car).
Force feedback settings (since v0.8.24, more have been added):
The sounds now have their own page.
The car is split up into several models. The parts that have an associated 3D model use a model chunk. Within that chunk you can specify model.file, which indicates the DOF file to use (from the car directory), and a scale.x/y/z, with which you can scale the model. It is recommended you do NOT use the scaling, as this takes time when loading and may confuse you in the Modeler.
More information on the exact definition of model chunks can be found in the car models tutorial.
A small section on AI modifies the car behavior when in AI mode (press Shift-A during a race to toggle AI). The following AI parameters are available per-car:
![]()
The setting body.mass indicates the mass in kg. Note that the engine weight is added (engine.mass) as may others (a driver for example).
Very important for the handling, the center of gravity is specified in car.cg.x/y/z. For versions upto (and including) v0.5, the X and Z values were ignored; this is because the CG must match the center of the (graphical) body model. Now, a nullpoint is defined, which basically is where-ever you'd want it, but mostly it's quite close to the CG (and it is recommended to be close to the CG itself for all the offsets to make sense). The nullpoint makes it possible to independently move your 3D model and your CG to match up.
More information on the nullpoint way of thinking can be found here.
| To the right you see a typical car. Notice the numbering of the wheels. Actually, the suspensions (their body attachment points) define the locations of the wheels. The axis system is that which OpenGL uses (the SAE uses a different vehicle axis system, but I've adopted OpenGL's system for ease of graphics display). The Y goes up through the roof of the car. This image shows the local coordinate system of the car as it was defined in the modeler. You can move the CG relative to the nullpoint in car.cg.x/y/z. The nullpoint isn't shown here, but it's the point from which every other location is calculated. The nullpoint by definition IS location (0,0,0). |
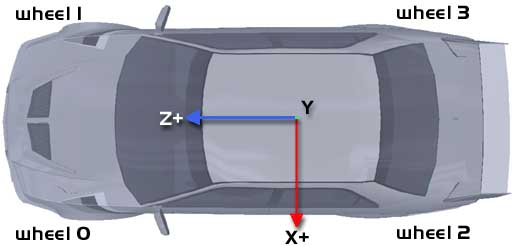 |
The lower the CG height (cg.y), the more stable the car. A height of about 0.3 to 0.4 (m) is typical for most cars (check the Ctrl-9 screen to see the actual CG height; this isn't the same as your cg.y, but is the result of all springs stabilizing in a steady state), although F1 cars might get lower ones. Values below 0 are not physically possible; the CG Y value will always lie somewhere in the bounding hull of the car (to visualize the hull, imagine pulling a cloth all over the car and pulling it tight; the shape of the cloth is then approximately the bounding hull).
Center of gravity - on weight distribution
If you have been working on vehicle setups in Racer, you probably noticed a pair of telemetry outputs listed under Ctrl+9 ingame, called theoretical and actual weight % at front. These indicate the percentage of the vehicle's weight which rests over the front axle.
Now you may have trouble matching the numbers in car.ini vs the intended weight distribution that you obtained from the car specifications.
There are two ways to define weight distribution though!
Before the "how-to" part, here is a quick definition of the two interpretations:
The common way to measure weight distribution in real life is to put the vehicle on a set of scales, one under each axle or wheel. This is what I would call the total mass based approach, because it takes the entire vehicle at once. Values found in specification and testing sheets are nearly always total mass based, which is why it is natural - but wrong - to assume Racer would treat it like this as well.
Racer distinguishes between the body.mass and the sum of all wheel.mass entries. body.mass is the so called sprung mass, wheel.mass entries for each wheel add up to the unsprung mass. If your car.ini defines engine.mass separately, that value has to be added to body.mass to obtain the total sprung mass. This split of masses is required for the handling model to work and it also forms the basis of Racer's weight distribution definition. As such, you might call this the sprung mass based approach.
Here is an example case that shows how we are meant to set weight distribution:
I have taken the sample data from a modern hot hatchback where kerb weight is given as 1387kg. For this example I assume this already includes fuel and a driver. The claimed static weight distribution for the total mass of the vehicle is 65% front, 35% rear. Front axle unsprung mass is 125kg, rear axle unsprung mass is 92kg. Finally, the wheelbase is 2.636m.
Racer requires us to use sprung mass based weight distribution so a few simple calculations are needed.
...and that is it. If you position your body mesh file so that cg.z is zero, the distance we just calculated is identical to the susp_front.z value of the vehicle. susp_rear.z is then wheelbase minus susp_front.z.
To be more explicit, using the numbers above you get these car.ini values:
The vehicle is now set for a sprung mass based weight distribution of 66.37% front. At the same time, total mass based weight distribution is at 65% front, which is shown correctly under Ctrl+9 (or the console command 'debug 9'). No extra data is needed to do these calculations, since all the values are required to fill out car.ini in any case. If you store the calculation in a spreadsheet or a maths application, it takes only seconds to get the result.
The inertia values describe how willing the car is to rotate around its local X/Y/Z axes (so around the Center of Gravity, or CG). The higher the number, the more energy it takes to rotate the car (the less quickly it will start rotating). The numbers are stored in body.inertia.x/y/z and have the SI units kg*m^2. I don't have a general formula for these numbers, but it seems like normally the X value is highest, the Y value is a little lower (90%) and the Z value is lowest (perhaps ~60% of the X value).
An example Ferrari of 1280 kg has a X inertia value of 1950. Lower weight cars have lower inertiae. A good empirical method that is in use for Sports/Formula style car is the following:
For example: you have car that weighs 525 kg, has a weight distribution of 40/60, a wheelbase of 2.78 m and the front wheels are 1.6 m away from the CG.
Car collision handling now has its own page.
![]()
The steering wheel in Racer is simple. It has lock (how many degrees it can turn), can deliver Ackerman effects (one wheel turning more than the other) and has linearity added to modify steering responsiveness per car.
The steering wheel is represented by a 3D model.
The maximum graphical angle of the steering wheel is specified in steer.lock (in degrees, not radians!). It's mostly a graphical option; the relationship to your real controller's lock may be preserved if you specified it in your controlset (not yet in v0.5.0).
The steering ratio (ratio of steering wheel rotation divided by wheel lock) is calculated based on this value, and the value of wheel 0's lock (wheel0.lock). So: steeringRatio=steer.lock/wheel0.lock.
The Ackerman effect is that of the inner wheel turning more than the outer wheel in a tight turn. This improves turn-in for low-speed big-angle corners.
Theory: although Ackerman steering geometry is used on a lot of passenger cars, it is less common on racing cars. This is because at racing speeds the wheel deflection will generally not exceed 10 degrees, and the effect of Ackerman geometry would be very little, so leaving it out isn't a problem. At the opposite side, karts often have a LOT of Ackerman steering.
For more control of the steering 'feel', you can adjust steering linearity per car. You do this with steer.linearity. The default is 1.0, meaning fully linear. For more info on this value, see linearity above.
Next to the global control settings, you can modify force feedback strength per car. This helps to subtly modify force feedback for some cars.
![]()
The engine now has its own page.
![]()
Gearbox, automatic transmission etc
The gearbox now has its own page.
![]()
The car camera definitions now have their own page.
![]()
To be able to drive the car, you can sometimes expect some help to be implemented. Currently (v0.5.2 beta 5) automatic shifting and traction control are implemented. ABS is scheduled for the future.
Driver aids - automatic shifting
Automatic shifting is possible by setting engine.shifting.automatic to 1. See Gearbox shifting for more details.
Driver aids - traction control
Traction control can be used to avoid spinning the (often rear) wheels while accelerating. It is allowed in certain classes to implement this. When the wheel speeds differ too much, TC kicks in and cuts the throttle, until the wheel speed ratio returns to acceptable levels.
Currently traction control uses wheel speeds (rotational velocities) to determine a ratio. The front wheel speed is the combined (averaged) rotational velocity of front wheels, and the rear speed is similarly an average of the rear wheels speed. Note that versions before v0.8.3 did an addition of all velocities, so if the number of front wheels and rear wheels isn't equal, you'd get incorrect traction control behavior.
The following variables determine the behavior:
ABS (anti-lock braking system) is implemented since Racer v0.5.2b5.3.
ABS can be used to avoid locking the wheels while braking. When the wheel speeds (see traction control) differ too much, ABS kicks in and releases the brakes, until the wheel speed ratio returns to acceptable levels.
The wheel speed ratio is calculated the same way as with traction control.
The following variables determine the behavior:
(last updated January 21, 2014 )