| Home | If you can't get your controller(s) to work, try reading this text to fix it. |

|
|
|
Introduction
This file gives under-the-hood information on control definitions. You can find more high-level documentation here.
Control set files are used to state what controllers and which axes are used to control which things of the car. Normally, from Racer v0.5.1 on, you use the controller setup screen (select Options, then Controls from the game menu) to do most of your controller setup. However, for some real fine tuning, this documentation may still be useful, if only to understand what's going on underneath the hood.
The control set files are stored in the Racer installation directory, specifically in data/controls/. They're plain ASCII files; edit them with any text editor.
Note that v0.5.3+ versions moved the files from data/ctrlsets/ to data/controls/. The older data/ctrlsets/* files separated controllers & controls, while the newer format directly specifies for each defined controller what controls are used. The revision was necessary due to a large number of supported proprietary controllers, making it a bit easier. For the Mac you will need product & vendor id's still; see below for a list of known controllers that should work.
Before you start
The controls setup screen
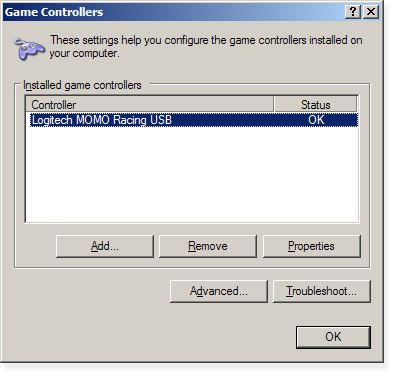
Racer v0.8.7 incorporates an improved control setup screen. You can now try to auto-detect your controls (click the button). It does this by checking all controllers attached to the computer. The names of these you can also see in your Control Panel, as you can see below:

Above you can see that a Logitech MOMO wheel is detected. Racer will convert the exact name to use lowercase and replaces spaces with underscores (_); for the example above the 'Logitech MOMO Racing USB' wheel is converted into 'logitech_momo_racing_usb.ini'. That file is searched for in data/controls/presets. If found, the file is used and you should be all set. You can still overrule controls in the setup screen if you want.
If your controller is NOT recognized, here's what you can do to make it recognized:
The controllers
At the top of the file you can enter what controllers you intend to use. You can use more than 1 controller. Don't supply any controllers that you will not use, as it costs time to read the controllers (your framerate may drop, so don't).
Parameters for each controller include:
Force feedback
To use force feedback, set controller<x>.force_feedback to 1. This brings in some new parameters.
The control names
The controls themselves have names for what functionality they control. Note that not all keys are configurable; some are encoded in the software and cannot be modified. The customizable functions are:
Notice that in the car.ini file from the car you can select automatic gear shifting.
For every control, you can decide whether to attach this to a key (keyboard), an axis (analog controller), a button (controller/mouse) or a POV hat setting (point-of-view hat, used for joysticks and some wheels or shifting controllers like the ActLabs Shifter). For an axis, you must specify with 'min' at what controller value the control is minimally applied. Read that twice; it means you can have 'min'>'max' (!). In other words, when the controller value is at 'min', the associated control is at its minimum application. So if your throttle axis gives for example: fully depressed => value=-1000, released => value=1000, then you set min=1000, max=-1000. This can be somewhat confusing.
For POV hats, set 'max' to the value which the POV hat must have for the control to be activated. For example, when selecting East on your POV hat, the input will be in hundreds of degrees, thus 90000. Set 'max' to 90000, and 'pov' to the POV hat index (mostly you'll have just 1, so set it to 0).
Axes, buttons, POV and key settings are mutually exclusive; you can't use more than 1 for the control.
Controller lock can be specified (in data/controls/default.ini or one of the presets). Used it on a G27, setting lock
to 900 in the controls file and in the Logitech Profiler software. Setting it lower in Profiler just gives
a mild software-controlled lock which is not too useful, so I just leave it at 900.
See data\controls\presets\logitech_g27_racing_wheel_usb.ini for an example (joystick0.lock=900).
Set the car.ini's steer.linearity to 1.0 preferably. Now, the steering lock will match that of the wheel directly. Racer caps the steering lock to what the car can do (car.ini's steer.lock), so for this feature you really need a capable (900 degree wheel), otherwise you won't be able to make the degrees required for the car to turn fully.
The default controller lock is 0, so people with less capable wheels
can still play (probably setting linearity for the controller to around 0.5). In that case,
the full range of the controller maps to the full range of the car's steering wheel. This is useful since you always get the full range intended for the car, where if you set lock directly, your wheel must be capable enough to deliver enough 'degrees' to be able to fully the steer the car. For example, if you have a car with (in car.ini) steer.lock=1200, then a 900 degree wheel will NOT get you enough lock to fully steer the car.
You can use any kind of direct free shift device, such as those available from ActLabs or the ones that come with the Logitech G25/G27 wheels, if supported by your OS. To enable freeshifting, set global.free_shifting to 1. Then use the shift_r, shift_1 etc. controls to define which controls shift to which gear. Actually, from Racer v0.8.19, freeshifting is automatic, but it's good to set the value regardless of this automatic feature to get it right from the start (the initial gear might be different for example).
An example preset file
This is data/controls/presets/logitech_momo_racing_usb.ini:
;
; Logitech MOMO Racing USB wheel
; 16-11-09 Ruud van Gaal
;
global
{
  free_shifting=0
}
controllers
{
  mouse
  {
    enable=1
  }
  keyboard
  {
    enable=1
  }
  joystick0
  {
    enable=1
    index=0
    force_feedback=1
    kerb_magnitude_factor=1
    kerb_period_factor=1
    max_torque=20
    max_force=10000
    deadzone=0
    latency=0
    friction=1000
    inertia=0
    steerleft
    {
      axis=x
      min=-1000
      max=0
      button=-1
      pov=-1
      negate=1
      make_analog=0
      linearity=1.000000
      sensitivity_rise=0.000000
      sensitivity_fall=0.000000
      key=
    }
    steerright
    {
      axis=x
      min=0
      max=1000
      button=-1
      pov=-1
      negate=0
      make_analog=0
      linearity=1.000000
      sensitivity_rise=0.000000
      sensitivity_fall=0.000000
      key=
    }
    throttle
    {
      axis=y
      min=-1000
      max=1000
      button=-1
      pov=-1
      negate=1
      make_analog=0
      linearity=1.000000
      sensitivity_rise=0.000000
      sensitivity_fall=0.000000
      key=
    }
    brakes
    {
      axis=rz
      min=-1000
      max=1000
      button=-1
      pov=-1
      negate=1
      make_analog=0
      linearity=1.000000
      sensitivity_rise=0.000000
      sensitivity_fall=0.000000
      key=
    }
    shiftup
    {
      axis=
      min=0
      max=1000
      button=1
      pov=-1
      negate=0
      make_analog=0
      linearity=1.000000
      sensitivity_rise=0.000000
      sensitivity_fall=0.000000
      key=
    }
    shiftdown
    {
      axis=
      min=0
      max=1000
      button=0
      pov=-1
      negate=0
      make_analog=0
      linearity=1.000000
      sensitivity_rise=0.000000
      sensitivity_fall=0.000000
      key=
    }
    clutch
    {
      axis=slider1
      min=-1000
      max=1000
      button=-1
      pov=-1
      negate=1
      make_analog=0
      linearity=1.000000
      sensitivity_rise=0.000000
      sensitivity_fall=0.000000
      key=
    }
    handbrake
    {
      axis=
      min=0
      max=1000
      button=6
      pov=-1
      negate=0
      make_analog=1
      linearity=1.000000
      sensitivity_rise=5.000000
      sensitivity_fall=50.000000
      key=
    }
    starter
    {
      axis=
      min=0
      max=1000
      button=7
      pov=-1
      negate=0
      make_analog=0
      linearity=1.000000
      sensitivity_rise=0.000000
      sensitivity_fall=0.000000
      key=
    }
    speedlimiter
    {
      axis=
      min=0
      max=1000
      button=5
      pov=-1
      negate=0
      make_analog=0
      linearity=1.000000
      sensitivity_rise=0.000000
      sensitivity_fall=0.000000
      key=
    }
    pov_yaw
    {
      axis=
      min=0
      max=1000
      button=2
      pov=-1
      negate=0
      make_analog=0
      linearity=1.000000
      sensitivity_rise=0.000000
      sensitivity_fall=0.000000
      key=
    }
    pov_pitch
    {
      axis=
      min=0
      max=1000
      button=3
      pov=-1
      negate=0
      make_analog=0
      linearity=1.000000
      sensitivity_rise=0.000000
      sensitivity_fall=0.000000
      key=
    }
    lights
    {
      axis=
      min=0
      max=1000
      button=4
      pov=-1
      negate=0
      make_analog=0
      linearity=1.000000
      sensitivity_rise=0.000000
      sensitivity_fall=0.000000
      key=
    }
  }
}
The Mac needs product & vendor id's to be able to find the joystick. From Apple you can download the HID Explorer, a utility which will show attached HID devices, with vendor & product ID's.
HID Explorer might not be supported anymore, in which case you can also try the Joystick & Gamepad tester from Alpha Omega software.
Example Mac extract:
;
; Controls configuration
;
controllers
{
  ; How many controllers to use from this list?
  count=1
  ; Define all controllers
  controller0
  {
    ; Main controller
    ; Index in the list of game controllers
    index=0
    force_feedback=0
    deadzone=0
    ; Mac specific
    vendor=1133
    product=49811
... <define controls used from this controller>
  }
...
}
Known product/vendor combinations:
| Controller | Vendor ID | Product ID |
| Logitech Wingman Formula Force GP | 1133 | 49811 (49812 as well?) |
| Logitech MOMO wheel | 1133 | 51715 |
| Logitech Formula Force RX | 1133 | 8448 |
(last updated November 13, 2012 )