| Home | Use your favorite 3D editor to create tracks, then import the pieces into TrackEd and drive your own track. |

|
|
|
This page describes the track camera systems that exist in Racer. The old one is more fixed and less natural than the later keyframed system.
TRACK CAMERAS
Track cameras - OLD system (v0.5):
Track cameras - NEW keyframed system (v0.5.3 beta1.5+):
TRACK CAMERAS - V0.5.0 OLD SYSTEM
How should I add a track camera?
First, move to the spot where you want the camera to be placed. You can use the cursor keys, or select a point on the track (click the left mouse button) and press 'G'. When you're at the right spot (and height! use Shift-Up and Shift-Down to move up/down), look around you (right mouse button and move) and pick a spot for the driving direction. The imaginary line from your position to the pick point should be the general driving direction of the cars that pass the camera. This is used in dollying the camera. Then click 'Declare as camera'. Clear the edit control if you want to create a new camera, or enter the camera number if you want to replace an existing camera.
How does track camera selection work?
The radii of the trackcams define the pickup area. The rules are as follows (as of v0.5.0final), in prioritized order (so if the first rule fails, the next is taken etc.):
How can I preview a track camera's motion?
Each camera has 3 cubes associated with it to assist with previewing.
Place the first (edge) cube on the track where you expect a car to be when the
camera picks it up (at the edge of the radius). Select a point on the track
and click 'Place edge cube'. Then select a close-by position, and place the
'close' cube. Then do the same for the 'far' cube.
After you have done this, click 'Preview motion' or press P.
The first time, this will load a car which is used to fake a small cube that
will move from edge -> close -> far, giving you an impression of the camera's
motion.
The dolly endpoint gives you moving cameras. When you define a camera you go to the start point (so you can see what it will look like a bit by looking around). Then, click on a point which is in the driving direction of the car. This driving direction is the line along which the distance of the car-to-camera is calculated, so make sure it's somewhat the driving direction of the car near the camera. When the car moves, a distance is calculated as follow: the car's position is projected onto the direction line. Then, this distance is divided by the camera radius (yes, a bit awkward). So if the car is 50m away (as projected on the line you defined when creating the camera), and the camera radius is 100m, you get a normalized distance of 50/100 = 0.5. These distances are internally capped to [-1..1] and then used to control the far/edge/close zooming, AND to interpolate from the camera starting point to the dolly endpoint.
TRACK CAMERAS - KEYFRAMED (NEW) SYSTEM
The keyframed system uses (as the name implies) a series of keyframes per defined camera to define the motion. It's more flexible than the more rigid older system described above.
If you already have old-style cameras, go into the track directory (data/tracks/<yourtrack>/) en make a copy of special.ini. Then edit special.ini (with Notepad for example) and remove the entire tcam tree.
Select 'Track keyframe cameras' as the mode (F3). Click on 'Add new KF camera'. This camera will then be active.
Then you need to define keyframes. All spline points are indicated by green dots. Select a spline (Shift+left mouse button) until you see a 'Selected spline' in the stats (upper lefthand corner) displays a value other than -1. Then adjust the camera to match the view you want to have when the car is near that spline (note that this means you can also turn the camera AWAY from the car, so that it would be invisible at that point).
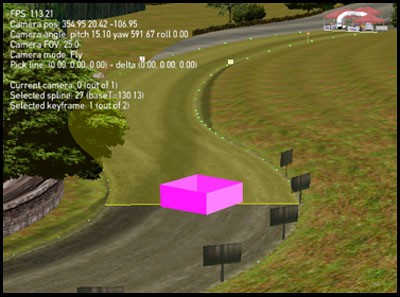
Then click 'Set keyframe (Shift-ENTER)' to define the keyframe. Something like below should appear (the track becoming yellow and a purple box displayed at the center of the road; indicating where the car approximately will be).
Notice that with only 1 keyframe the entire track is selected (all splines). Now move a bit further up the track, select another spline and create another keyframe (with Shift-ENTER). Now, the camera has a normally defined range, as indicated by the yellow track surface. The purple box indicates the center of the road (where the car is approximately).

Notice that the previous and next camera's active sections are shown in red, the current camera's section is shown in yellow. Try pressing 'P' for a preview of the motion you just created.
How does track camera selection work?
Use PageUp and PageDown to select the camera to edit. Use Shift-Left and Shift-Right to move through the keyframes.
How can I preview a track camera's motion?
Select the camera you want to preview with PageUp/PageDown and press P.
(last updated December 30, 2014 )